Showing posts with label Outlook. Show all posts

How to troubleshoot office activation licence issue

By // No comments:


How to troubleshoot office activation licence issue

In this article we will see that how to troubleshoot office activation licence issue. These step practiacally followed by us and 100% working. Please follow several method step by step which help to resolve your query.
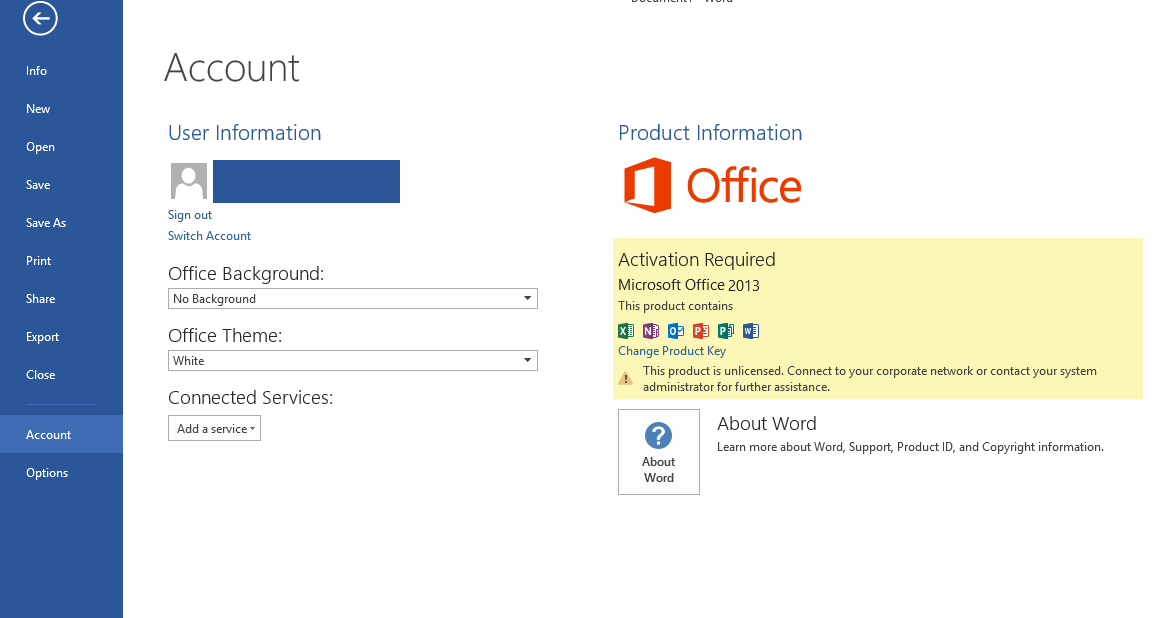

First Method

Step:  Go to Control panel > Click on Credential Manager > Remove all office 365 email credential from window credentials.


Second Method:

Step: Open cmd(Command promopt) with administrator previlage > type cd c:\Program files\Microsoft office\office16 > then type cscript ospp.vbs /dstatus > after that you will see multiple key (as mentioned in screenshoot 3RQ6B & GMR2K) > Type cscript ospp.vbs /unpkey: 3RQ6B & cscript ospp.vbs /unpkey: GMR2K  (to remove license from office) and after that you can reactivate office licence.


Note:- If still you face office activation licence issue then follow last method and we are dam sure that last method will resolve your issue 100%.


Third and Last Method:

Step: Open Run(Press Window+R botton) > Type regedit and press Enter > Go to location (Computer\HKEY_LOCAL_MACHINE\SOFTWARE\WOW6432Node\Microsoft\Office\16.0\Common) > Then right link on OEM and delete that > After that please close these. Then open office type user name password of your email account, you will see that your office licence activate.


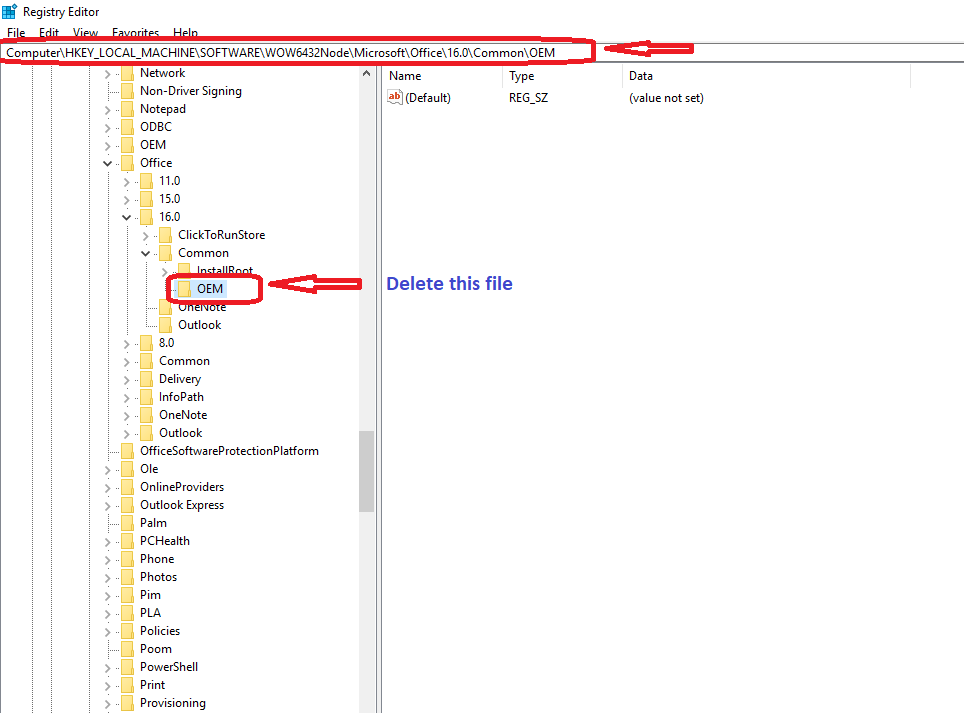
Thanks to follow these steps and hope these steps resolve your office licence activation issue. if still you are facing any issue. Please leave comment and drop email  (Onlinenetworkssolution@gmail.com) on our official email account.

Please leave comment that we can write more article regarding daily basis issue because your comment motivate us to write more.

Thanks to all of you once again.

Red X's in Email Messages on outlook

By // No comments:

Pictures cannot be displayed and are shown as red X in Outlook?

Red X's in Email Messages?


1) Delete Temporary Internet Files from registry location.

Step1: Click on Start, type Run and then type regedit.exe.


Step2: Locate the following registry subkey:

Office 2010:
HKEY_CURRENT_USER\Software\Microsoft\Office\14.0\Outlook\Security 
Office 2007:
HKEY_CURRENT_USER\Software\Microsoft\Office\12.0\Outlook\Security
Office 2003:
HKEY_CURRENT_USER\Software\Microsoft\Office\11.0\Outlook\Security

Step3: You will see OutlookSecureTempFolder double click on that and copy location and delete main folder and then restart outlook.


2) Disable Don't download pictures automatically in HTML e-mail messages or RSS items.

Step 1:- Click on File and click on option


Step 2:- Click on Trust Center and then click on trust center setting.


Step 3:- Click on Don't download pictures automatically in HTML e-mail messages or RSS items and Click  on Ok.


Congratulate!!! Finally you have done
.

How to schedule Auto Send & Receive in Microsoft Outlook

By // No comments:


If you’re busy during the day and need to keep up with your emails, you might want want Outlook to check for new messages every few minutes. Here we’ll show how to schedule it in Office 2010, 2007, and 2003 for a busy inbox where you want to keep on top of your important emails.

Outlook 2010

To schedule Auto Send/Receive in Outlook 2010, click on the File tab then Options.


The Outlook Options window opens…click on Advanced and scroll down to Send and receiveand click on the Send/Receive button.


In the Send/Receive Groups window under Setting for group “All Accounts” check the boxSchedule an automatic send/receive every…minutes. It is set to 30 minutes by default and you can change the minutes to whatever you want it to be. If you’re busy and want to keep up with your messages you can go as low as every one minute.


You can also get to the Send/Receive groups by selecting Send/Receive tab on the Ribbon and then Define Send/Receive Groups.


Outlook 2007

To select the send/receive time intervals in Outlook 2007, open Outlook and click on Tools \ Options.


Click on the Mail Setup tab, check the box next to Send immediately when connected then the Send/Receive button.


Now change the schedule to automatically send/receive.


You can also access the Send/Receive Groups section by going to Send/Receive > Send/Receive Settings and Define Send/Receive Groups.


Outlook 2003

In Outlook 2003 click on Tool \ Options…


Click on the Mail Setup tab then check Send immediately when connected, then the Send/receive button.


Then set the amount of time between send/receive attempts.


If you live out of Microsoft Outlook and want to keep up with messages, setting the automatic send/receive minutes will keep you up to date.

How to repair Outlook Data Files (.ost)

By // No comments:

These error when your outlook pst file corrupt so you need to repair. following these step:-


Repair .ost file by Microsoft repair ost tool.


Offline Outlook Data Files (.ost) are copies of your Exchange information. It is not necessary to back up this file. You can create a new copy at any time.

Exit Outlook.

In Control Panel, click or double-click Mail.

Mail appears in different Control Panel locations depending upon the version of the Microsoft Windows operating system, Control Panel view selected, and whether a 32- or 64-bit operating system or version of Outlook 2010 or Outlook 2007 is installed.


The easiest way to locate Mail is to open Control Panel in Windows, and then in the Search box at the top of window, type Mail. In Control Panel for Windows XP, type Mail in the Address box.

NOTE: The Mail icon appears after Outlook starts for the first time.

The title bar of the Mail Setup dialog box contains the name of the current profile. To select a different existing profile, click Show Profiles, select the profile name, and then click Properties.

On the E-mail tab, select the Exchange account, and then click Change.

Clear the Use Cached Exchange Mode check box.

Click More Settings.

On the Advanced tab, click Offline Folder File Settings.

Click Disable Offline Use, and then in the dialog box that appears, click Yes.

NOTE: If you cannot click Disable Offline Use, this indicates the Use Cached Exchange Mode check box was not cleared in step 4. This check box must be cleared.

Again, click Offline Folder File Settings.

Click OK.

In the dialog box that appears, click Yes.

Under Cached Exchange Mode Settings, select the Use Cached Exchange Mode check box.

Click OK, click Next, and then click Finish.

In the Account Settings and Mail Setup dialog boxes, click Close.

How to repair Outlook Data Files (.pst)

By // No comments:

These error when your outlook pst file corrupt so you need to repair. following these step:-


Inbox Repair tool (scanpst.exe)

Scanpst.exe is installed on your computer when you install Microsoft Outlook 2010 or Outlook 2007. The Inbox Repair tool tries to correct any problems by resetting the data file structure and rebuilding the headers for Outlook items. If you are using an Exchange account, the tool does not connect to or analyze the data saved on the Exchange server.


IMPORTANT: You must exit Outlook before using the Inbox Repair tool. It is not accessible within Outlook.

Open Windows Explorer and select the drive:\Program Files\Microsoft Office\OFFICE14 folder.

NOTE: If you're using Outlook 2007, select drive:\Program Files\Microsoft Office\Office12

Double-click Scanpst.exe.

In the Enter the name of the file you want to scan box, enter the name of the .pst or .ost file that you want to check, or click Browse to select the file.

To specify the scan log options, click Options, and then click the option that you want.

Click Start.

If errors are found, you are prompted to start the repair process to fix the errors.

A backup file is created during the repair process. To change the default name or location of this backup file, in the Enter name of backup file box, enter a new name, or click Browse to select the file that you want to use.

Click Repair.

Start Outlook with the profile that contains the .pst file that you tried to repair.

In the Navigation Pane, click Folder List.

Keyboard shortcut To open switch to the Folder List, press CTRL+6.

In the Folder List, you might see a folder named Recovered Personal Folders that contains your default Outlook folders or a Lost and Found folder. The recovered folders are usually empty, because this is a rebuilt .pst file. The Lost and Foundfolder contains the folders and items recovered by the Inbox Repair tool.

You can create an Outlook Data File (.pst), and drag the items in the Lost and Found folder into the new data file. When you have finished moving all the items, you can remove the Recovered Personal Folders (.pst) file, including the Lost and Found folder, from your profile.

NOTE:

If you are able to open the original Outlook Data File (.pst), you may be able to recover additional items from your damaged .pst file. By default, the Inbox Repair tool creates a file with the same name, but with the file extension of .bak. The .bak file is located in the same folder as your original .pst file. You may be able to recover items from the .bak file that the Inbox Repair tool could not recover. Make a copy of the .bak file, and give the file a new name with a .pst extension, such as bak.pst. Import the bak.pst file, and then move any additional recovered items to the new .pst file that you created.


A copy of the log file is saved to the same folder as the .pst file.

How to import .nk2 files into Outlook 2013 or Outlook 2016

By // No comments:

How to import .nk2 files into Outlook 2013 or Outlook 2016

To import .nk2 files into Outlook 2013 or Outlook 2016, follow these steps: 
 
Make sure that the .nk2 file is in the following folder:

%appdata%\Microsoft\OutlookNote The .nk2 file must have the same name as your current Outlook 2013 or Outlook 2016 profile. By default, the profile name is "Outlook." 


To check the profile name, follow these steps: 

Click Start, and then click Control Panel. 

Double-click Mail. 

In the Mail Setup dialog box, click Show Profiles. 

Click Start, and then click Run. 

In the Open box, type outlook.exe /importnk2, and then click OK. This should import the .nk2 file into the Outlook profile.

Note: After you import the .nk2 file, the contents of the file are merged into the existing nickname cache that is currently stored in your mailbox.The .nk2 file is renamed with a .old file name extension on the first start of Outlook 2013 or Outlook 2016. Therefore, if you try to re-import the .nk2 file, remove the .old file name extension.

Microsoft Outlook Error 0x80040201

By // No comments:
How to troubleshoot when error 0x80040201 occurred Microsoft Outlook.


First Reason and Solution:

This problem mostly generates due to the corrupted Outlook profile. So as a first recommendation, remove the account and create the new one.

Here are the given steps to create a new profile:

First close MS Outlook. 

Click on Windows icon and move the cursor toward the control panel. 

Open the “Mail” option. 


By clicking on Mail option, you will get a settings pop up window on the screen. Here, go to “Show Profiles” and open it. 

Start the configuration of the new email account for your email client using “Add” button. 

Add a profile name and click on “Ok” button to move to the next step. 

Now, Auto-Account Setup option asks you to input several basic details like name, email address and password. Move to the next step after filling all the by clicking on the “Next”button. 

Outlook will automatically start synchronizing the input details from the server in order to configure the account. 

After successful configuration of account, finish the process by making a click on “Finish” button. 

Also, check the box "Prompt for a profile to be used" option and click on “Ok”. It tells Microsoft Outlook that with which account it should initiate itself. 

Finally, restart Outlook and select new profile.

Second Reason and Solution:

Sometimes, Outlook Error 0x80040201 appears when a user starts using Outlook with a local PST after disconnecting it from the Exchange server. The contacts of GAL still remain in the Outlook in a corrupt form and start showing error code 0x80040201. In short, corruption within the NK2 file or the cached contacts file may also produce these errors which could be fixed by removing and deleting these contacts or NK2file.

To resolve Outlook Error code 0x80040201 or to delete corrupted NK2 contacts, there are two ways that has described below:

Start typing the address that shows incorrectly 

Hit down arrow key to select an auto complete address 

Hit Delete key to delete auto complete address

The other way is to delete corrupted or damaged cached email address:
Open the windows explorer and paste the path in the address bar: %APPDATA%\Microsoft\Outlook
 
Found the NK2 file at the defined location and delete it.

The problem you are experiencing most often occurs when the Outlook profile is corrupt. I recommend you use following steps to create a new profile.

Create a new Outlook profile

========================================

1. Close Outlook.

2. Click Start menu-> Control Panel. If Control Panel is not in Classic View, click Switch to Classic View, and then double-click the Mail icon.

3. Click Show Profiles and then click Add. In the New Profile dialog box, type a descriptive name for the new profile in the Profile Name box, and then click OK.

4. In the E-mail Accounts dialog box, click "Add a new e-mail account", and then click Next.

5. Select the appropriate server type for your e-mail account, and then click Next.

6. Fill in the appropriate information as prompted, and then click Next and Finish as needed.

7. Click the "Prompt for a profile to be used" option and click OK. This way, you will be prompted for a profile when starting Outlook.

8. Restart Outlook and select the new profile.