Showing posts with label Router. Show all posts

How to install Juniper ios in GNS

By // No comments:

How to install and configure Juniper router Image with GNS3 all in one with VortualBox


Today we are going to share with all of you that how install and configure Juniper router ios on VirtualBox in GNS.
In this post we are sharing some way for using Juniper router on GNS3.

Before Installation we need the following software for this:

1: Juniper Image = JunOS Olive image VM (Please download Juniper ios from this link: Here)

2: Pre Installed GNS3

3: Pre Installed Oracle VM VirtualBox - (It's totally free download from internet)

Please follow step by step to install and configure Juniper router image with GNS3 all in one JunOS with VirtualBox:

Step 1: Right Click on JunOS Olive > open with >  VirtualBox > click on import > Select Juniper IOS > Ok.


It will look like.

Step 2: Open GNS3 All in one > Click on Preferences > Click on VirtualBox > click on New > select VM list such as JinOS 1 > Click on Finish > then Click on Ok.


Step 3: Juniper router will be appear on End device  >  Click on JunOS 1


Step 4 : Right click on JunOS 1 > Click on configure > Select Network tab > Change Adapters > ok.


Step 5: Now you can use so please click on device > start .
if you are facing any problem so you can use VirtualBox console. User name is root for this junOS VM


Hope this will help to all of you and resolved your all query if you have any query or question so you may ask to send email on our email account (onlinenetworkssolution@gmail.com) or leave comment on page.


Download Juniper Router IOS

By // No comments:

How to download Juniper Router IOS  for GNS


Juniper Olive IOS is very excellent complementary tool to real work practice for Network engineer, administrator and other people who want practice and work on real juniper router. People who want to take certification of CCNA, CCNP, CCIE and another cisco certification Juniper Olive provide a good plate form for practice. This tool is open source and free program which used only for study purpose please don't use it in commercial.


JunOS Olive is a software which you can use on PC. Olive was used by Juniper internally for lab work, but now it become a source to learn the JUNOS CLI on a low-cost platform. Please note Junos olive is only for study and practice purposes , which is unsupported and unsupportable platform & it is not suitable for any type of commercial use.


Juniper Router IOS Download
user=root, without password


Hope this will help to all of you and resolved your all query if you have any query or question so you may ask to send email on our email account (onlinenetworkssolution@gmail.com) or leave comment on page.

Reset Mikrotik Router

By // No comments:

How to Reset Mikrotik Router.


Today we are gonna to do How to Reset Mikrotik Router/Reset To Factory Default Settings. You will lose all the configuration and other data on the router after you reset it. Please do very carefully.

Most MikroTik devices are fitted with a reset button. 

Look for the reset button labeled with “RES” on your MikroTik router.


Please follow all step by step to Hard reset Mikrotik Router:

Step 1: Turn off the device power.

Step 2: Hold the reset button and do not release.

Step 3: Turn on the device power and wait until the USER LED labeled with “ACT” starts flashing.


Step 4: Now release the button to clear configuration.

Step 6: Wait for a few minutes for the router to clear and restore the factory settings.

If you release the reset button after the LED stops flashing, you have to again whole process.

Hope this will help to all of you and resolved your all query if you have any query or question so you may ask and send email on our email account (onlinenetworkssolution@gmail.com) or leave comment on page.

How to enable SNMP in Mikrotik Router

By // No comments:

How to enable SNMP in Mikrotik Router


Today we will see that how to monitoring Mikrotik Router traffice using SNMP. In this post we will also most important protocol which help to monitor traffic.

[Root@Mikrotik]
  > /snmp

[Root@Mikrotik]
 /snmp > set enabled=yes contact=[YOURNAME] location=[LOCATION]

Next, set disable community public read access


[Root@Mikrotik]
 /snmp> community

[Root@Mikrotik]
/snmp community> print
# NAME ADDRESS SECURITY READ-ACCESS
0 public 0.0.0.0/0 none yes

[Root@Mikrotik]
 /snmp community> set public read-access=no
Add your community name and specify access ip address

[Root@Mikrotik]
/snmp community> add name=network address=10.10.10.0/24

[Root@Mikrotik]
 /snmp community> print
0 public 0.0.0.0/0 none no
1 network 192.168.10.0/24 none no

[Root@Mikrotik]
/snmp community> set network read-access=yes

Hope this will help to all of you and resolved your all query if you have any query or question so you may ask to send email on our email account (onlinenetworkssolution@gmail.com) or leave comment on page.

Configure NAT on Mikrotik Router

By // No comments:

How to configure NAT (Network Address Translation) on Mikrotik Router?


Network Address Translation: NAT  is a methodology of mapping  Private  ip address to another Public  ip address. Actually, private ip address can’t pass through internet without NAT. NAT provides of mapping between private ip address to route able public ip address. There  are many kind of NAT and to implement depends on what our goals are for NAT and our public ip address management.
·         Static NAT (One to One mapping):One to one mapping is also called static NAT it’s put a permanent ip mapping between an private ip address and a public  ip address.


·         NAT Overloading: It’s called Port Address Translation or PAT.In this case multiple private ip address space are able to share a common public ip address. Port address translation is reducing number of public ip address for network address translation.

·         Dynamic  NAT: Another  NAT method are Dynamic NAT. Dynamic map puts a dynamic mapping between an internal private ip address pool and a public ip address pool.It’s also create one to one relation on a FIFO algorithm basis .This method mikrotik router  called netmap.

NETMAP Configuration Example:

/ip firewall nat add  chain=dstnat action=netmap to-addresses=10.10.0.0/16
      dst-address=2.2.2.0/25 log=no log-prefix=""

/ip firewall nat add  chain=srcnat action=netmap to-addresses=2.2.2.0/25
      src-address=10.10.0.0/16 log=no log-prefix="
This configuration tell us a pool of ip address that are 10.10.0.0/16 mapped between a pool of an public ip address that are 2.2.2.0/25 is dynamically.


Hope this will help to all of you and resolved your all query if you have any query or question so you may ask to send email on our email account (onlinenetworkssolution@gmail.com) or leave comment on page.

Mikrotik NTP Server

By // No comments:

How to configure  NTP Server on Mikrotik Rotuer?


Today we will share will all of you that how to maintain our network device Date and Time for log analysis and report, This example show how to setup NTP server using Mikrotik Router OS.Configure NTP server need to install ntp.pak package for mikrotik router.


 /system ntp server
set broadcast=no enable=yes manycast=yes multicast=no


Hope this will help to all of you and resolved your all query if you have any query or question so you may ask to send email on our email account (onlinenetworkssolution@gmail.com) or leave comment on page.

How to backup and restore mikrotik router

By // No comments:
How to take backup and restore of Mikrotik router


Today we will learn that how to take backup and restore of Mikrotik router. In this post we guide you to take backup and restore via command mode and graphic mode. Hope this will help to resolve query.

First Method: 

To make backup file mode via winbox:

Click on File > Click on Backup > Give name BackupIpDmas > Ok .


To Copy backup file on Computer via winbox:

Select Backup file (BackupIpDmas) > Click on Copy Icon > Paste on computer in folder.

To Restore backup file from Computer via winbox:

Click on Upload button > Select Backup file (BackupIpDmas) > Ok > Restore and reboot? [y/N]:  > Y > ok > It will ask for restart automatically > ok.


Second Method:

To make a backup file use the following command:

[MikroTik] system backup save name=mikrotikbackup
Configuration backup saved


To load the saved backup file use the following command:

[MikroTik] > system backup load name=mikrotikbackup
Restore and reboot? [y/N]: Y


Default Route in Router

By // No comments:

How to Configure Default Route in Router on Packet Tracer?


Today we will learn that how to configure default route on Cisco router. Default route is a setting on a computer that defines the packet forwarding rule to use when no specific route can be determined for a given Internet Protocol (IP) destination address. All the IP datagrams with unknown destination address are sent to the default route.

Please see video to configure Default Route on Packet Tracer.


Please follow below steps to configure Default route in Router on Packet Tracer.

Default route in Router


Router1>en
Router1#config t
Router1(config)#int fa 0/0
Router1(config-if)#ip add 10.0.0.1 255.0.0.0
Router1(config-if)#no sh
Router1(config-if)#int fa 0/1
Router1(config-if)#ip add 1.0.0.1 255.0.0.0
Router1(config-if)#no sh
Router1(config-if)#exit
Router1(config)#ip route 0.0.0.0 0.0.0.0 10.0.0.2
Router1(config)#do wr


Router2>en
Router2#config t
Router2(config)#int fa 0/0
Router2(config-if)#ip add 10.0.0.2 255.0.0.0
Router2(config-if)#no sh
Router2(config-if)#int fa 0/1
Router2(config-if)#ip add 2.0.0.1 255.0.0.0
Router2(config-if)#no sh
Router2(config-if)#exit
Router2(config)#ip route 0.0.0.0 0.0.0.0 10.0.0.1
Router2(config)#do wr

How to connect dvr to internet without static ip

By // No comments:
How to connect dvr to internet without static ip?
How to configure DVR and Camera for Remote Viewing?

Today we are going to share with all of you that how to configure DVR and Camera for online accessing. It's very easy and helpful to configure. It help when you have not any static ip address still you are able to access Camera from outside network. but we use www.dvrdydns.com site of DDNS to access Camera.


Please follow step to step configure and access Camera from outside network:


 Camera Configuration:

Step1: Login Camera on Web Browser > Now  Go to Config Tab > Network > Put HTTP Port and Server Port  - By default HTTP Port 80 assign (i.e 81 and 6036)> Check mark on use the Following IP Address > Assign IP Address on Camera as given example > Apply.

IP Address : 192.168.0.100
Subnet Mask : 255.255.255.0
Gateway : 192.168.0.1
Preferred DNS Server : 192.168.0.1  

Note:-  By default HTTP Port 80 and Camera always login on Internet Explorer.


Port Forwarding on Router:

Step2: Login Router on Web Browser > Click on Advanced Tab > Click on Virtual Server/Port Forwarder > Do Port Forwarding on Router as given below screen shot.

Example:-
Service Name: DVR                                                               Service Name: WebCamera  
Protocol : TCP                                                                       Protocol : TCP
Local IP Address : 192.168.0.100                                         Local IP Address : 192.168.0.100
Local Port : 6036                                                                   Local Port : 81
Wan Port : 6036                                                                    Wan Port : 81


if you have static IP Address. Hope now you are able to online Camera access. 

Create DDNS Domain name on dvrdydns website:

Step 3: Login on www.dvrdydns.com website > Click on Domain > Create new DDNS Domain name (i.e sample2017.dvrdydns.com).


Now Configure dvrdydns domain name on Camera:

Step4: Login Camera account on Web browser > Config > Network > Check mark on DDNS to enable > Now select DDNS Type (i.e www.dvrdydns.com) > Type User Name > Password > Host Domain (i.e sample2017.dvrdydns.com) > Apply.


Now You are able to access your Camera via DDNS Domain Name from outside Network.

Successfully!!!!!!

Note:-  By default HTTP Port 80 and Camera always login on Internet Explorer.

Enable remote management on D-Link series router

By // No comments:
How do I enable remote management on D-Link series router? 

Today We will see that how to enable remote management on D-Link Series Router.These are modem feature which is help to access modem online from external network. But it's make your network unsecure because it's enable to access network from outside and password got so they can do anything.


Please follow step by step to enable remote management on D-link series router:

Step 1: Open a web browser and type the IP address of the D-Link series router into the address bar (default is 192.168.0.1).

Step 2: The default username is admin (all lower case) and the default password is blank (nothing). Click OK.

Step 3: Click on the TOOLS tab and navigate down to the ADMINISTRATION section.

Step 4: Check the box to Enable Remote Management.

Step 5: Enter the desired port in the Remote Admin Port dialogue box. You can also leave the default port at 8080

Step 6: Click on Save Settings to save your settings.

Once the Settings have been saved. To access your router remotely, from a web browser enter: http://<your wanip>:8080

e.g. http://61.95.235.93:8080

You can find your WAN IP by clicking on the STATUS tab. It will be displayed under the WAN Section.


Online access Router/Modem by domain from name outside

By // No comments:
How to Online access Router/Modem by domain from name outside?

Today We will learn about how to take remotely/online access Router,Modem, DSL+Router by Domain name from external network. This DDNS modem feature which is help to access modem online by domain name from external network. But it's make your network unsecure because it's enable to access network from outside and password got so they can do anything.


Make sure that your password not share anyone.

Please follow step by step to DDNS configure:

Launch an Internet browser from a computer or wireless device that is connected to the network.

1.Type http://your-router-ip-address


2. A login screen displays.

3.Enter the router user name and password.

4. The user name is admin. The default password is password. The user name and password are case-sensitive.

5. The BASIC Home screen displays.

6. Click the ADVANCED tab.

7. Select Advanced Setup > Dynamic DNS

8. Enable the Use a Dynamic DNS Service tick box, and then choose the 'Service Provider'       as www.no-ip.com/mynetgear.com/dyndns.com and so on.

9. Enter the Host name, Username and password for No-IP. Please note your No-IP account     must already be created and registered.

10. Click Apply to save these settings.


Remote access router from external network

By // No comments:
How to take Remotely/Online access Router, Modem, DSL+Router from external network?


Today We will learn about how to take remotely/online access Router,Modem, DSL+Router from external network. These are modem feature which is help to access modem online from external network. But it's make your network unsecure because it's enable to access network from outside and password got so they can do anything. 


Make sure that your password not share anyone.


Please follow step by step to enable Remote Management:
1. Access Modem/Router on web such as http://192.168.0.1/webpages/login.aspx.
2. Click on Advance Tab.

3. Now Click on Remote Management.

4. Now Check mark on Turn Remote Management on.

5. Change Port (i.e: 8443) according you for access Remote.

6. Click on Apply.

7. Now type URL:- https://public-ip-address:8443


Load balancing 2 WAN link on Mikrotik Router

By // No comments:
How to configure Load balancing between two WAN link and 1 LAN link on Mikrotik Router through command.

Today we will learn how to configure and setup Load balancing between 2 ADSL+Router/WAN Links in Mikrotik Router using PCC technology by command. Mikrotik 2 WAN Load Balancing using PCC technology. Please follow complete step by step for Mikrotik to load balance between 2 ADSL+Router links.

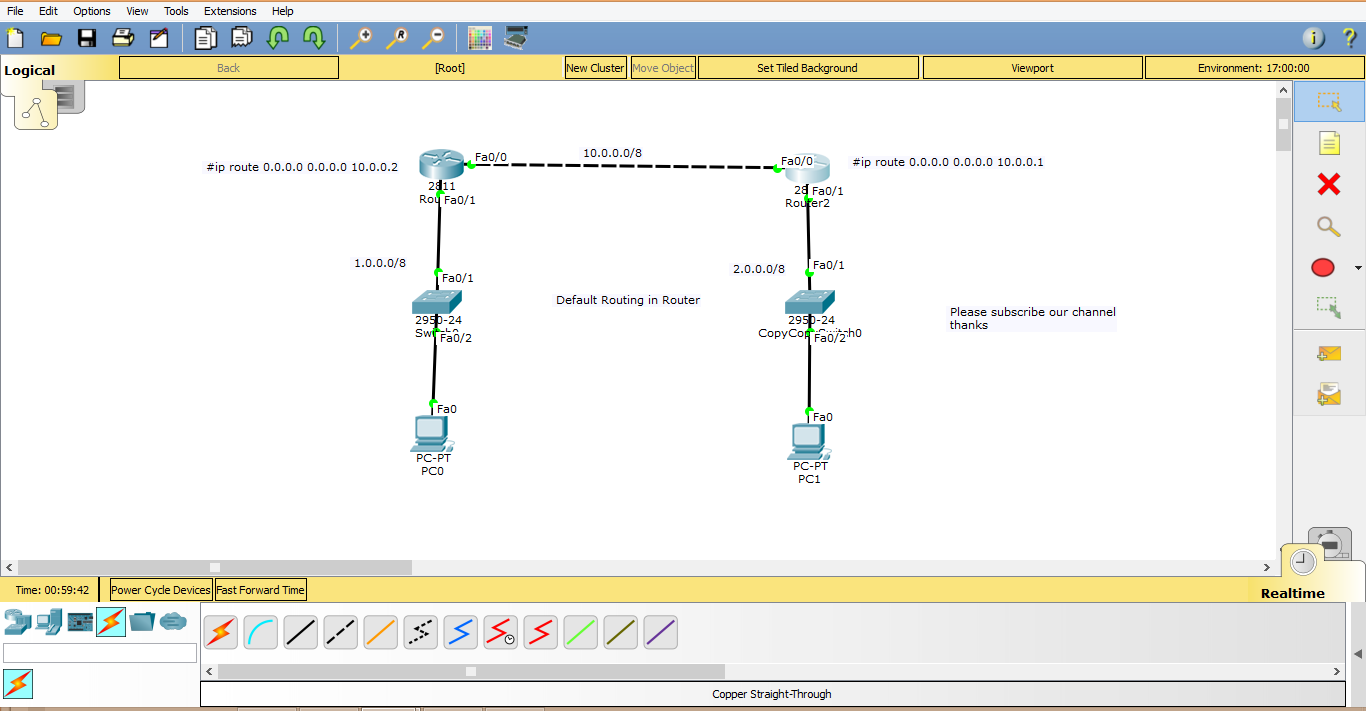
Two ports were connected for WAN link with two difference ADSL+Router Routers and third port was connected with LAN.

Load balancing between 2 WAN link on Mikrotik Router


Make sure that both link should be same speed such as 8 Mbps.

WAN_1 IP Address = 172.12.15.8
WAN_2 IP Address = 61.95.235.77
LAN IP Address = 192.168.0.1

Step 1:  Assign IP address on Interface:

/ip address

add address=192.168.0.1/24 network=192.168.0.0 broadcast=192.168.0.255 interface=LAN
add address=172.12.15.8/24 network=172.12.15.0 broadcast=172.12.15.255 interface=WAN_1
add address=61.95.235.77/24 network=61.95.235.0 broadcast=61.95.235.255 interface=WAN_2

Step 2: Put Global DNS IP address in DNS Server:

/ip dns set allow-remote-requests=yes cache-max-ttl=1w cache-size=5000KiB max-udp-packet-size=512 servers=8.8.4.4,4.4.2.2,8.8.8.8.

Step 3: Create Routing Policy:

/ip firewall mangle

add chain=input in-interface=WAN_1 action=mark-connection new-connection-mark=WAN_1_conn
add chain=input in-interface=WAN_2 action=mark-connection new-connection-mark=WAN_2_conn

add chain=output connection-mark=WAN_1_conn action=mark-routing new-routing-mark=to_WAN_1
add chain=output connection-mark=WAN_2_conn action=mark-routing new-routing-mark=to_WAN_2

add chain=prerouting dst-address=172.12.15.0/24 action=accept in-interface=LAN
add chain=prerouting dst-address=61.95.235.0/24 action=accept in-interface=LAN


add chain=prerouting dst-address-type=!local in-interface=LAN per-connection-classifier=both-addresses-and-ports:2/0 action=mark-connection new-connection-mark=WAN_1_conn passthrough=yes
add chain=prerouting dst-address-type=!local in-interface=LAN per-connection-classifier=both-addresses-and-ports:2/1 action=mark-connection new-connection-mark=WAN_2_conn passthrough=yes

add chain=prerouting connection-mark=WAN_1_conn in-interface=LAN action=mark-routing new-routing-mark=to_WAN_1
add chain=prerouting connection-mark=WAN_2_conn in-interface=LAN action=mark-routing new-routing-mark=to_WAN_2

Step 4: Assign Routing Policy on WAN interface:

/ip route

add dst-address=0.0.0.0/0 gateway=172.12.15.1 routing-mark=to_WAN_1 check-gateway=ping
add dst-address=0.0.0.0/0 gateway=61.95.235.1 routing-mark=to_WAN_2 check-gateway=ping

add dst-address=0.0.0.0/0 gateway=172.12.15.1 distance=1 check-gateway=ping
add dst-address=0.0.0.0/0 gateway=61.95.235.1 distance=2 check-gateway=ping

Step 5: Create NAT Policy

/ip firewall nat

add chain=srcnat out-interface=WAN_1 action=masquerade
add chain=srcnat out-interface=WAN_2 action=masquerade

Note:-

If your both un-equal WAN links, such as WAN_1 is 6 MB and WAN_2 is 8 MB using PCC method and you want to force Mikrotik to use WAN_2 link rather than WAN_1 link so you have to add more PCC rules assigning the same two marks to specific link such as WAN_2.

/ip firewall mangle

add chain=prerouting dst-address-type=!local in-interface=LAN per-connection-classifier=both-addresses-and-ports:2/0 action=mark-connection new-connection-mark=WAN_1_conn passthrough=yes
add chain=prerouting dst-address-type=!local in-interface=LAN per-connection-classifier=both-addresses-and-ports:2/1 action=mark-connection new-connection-mark=WAN_2_conn passthrough=yes
add chain=prerouting dst-address-type=!local in-interface=LAN per-connection-classifier=both-addresses-and-ports:2/2 action=mark-connection new-connection-mark=WAN_2_conn passthrough=yes

For Hotspot with PCC rules so please configure more one step.

/ip firewall nat add action=accept chain=pre-hotspot disabled=no dst-address-type=!local hotspot=auth


Hope this will help to all of you and resolved your all query if you have any query or question so you may ask to send email on our email account (onlinenetworkssolution@gmail.com) or leave comment on page.

How to configure Hotspot in Mikrotik Router

By // No comments:
How to configure Hotspot in Mikrotik Router?


Today we are going to share with all of you about how to install and configure hotspot in Mikrotik Router via WinBox. It's used to authenticate the user name and password over internet access. It has good feature and easy to configure. We have several option to configure authentication, Mac Address, Radius, CHAP and another authentication process. make sure that internet is working on your router. need to configure IP Address on interface, DNS IP Address, Route, mangle to make communication between network such as LAN to WAN, LAN to LAN.


Please follow step by step to configure hotspot in Mikrotik Router via WinBox.

Step 1:  Click on IP > Click on DHCP Client > select ether1 in interface > Make sure that check mark on DNS, NTP, Add Default Route > click on Apply and Ok.


Step 2: Make sure internet is working so please configure world wide use DNS IP Address such as 8.8.8.8, 8.8.4.4 and 4.2.2.2. 


Step 4: Click on System > Configure NTP Client > Check mark on Enabled > select unicast in Mode > Put Primary NTP Server and secondary NTP Server as shown below image > Click on Appy and Ok.


Step 5: Now we ready to configure Hotspot. 
             Click on IP  > Click on Hotspot > Click on Hotspot Setup > Select Interface & port on which you have to attach your device such as ether2 in Hotspot Interface > Click on Next.


Step 6: Put Local Address of Network such as 10.5.50.1/24 and make sure that check mark on Masquerade Network  > Click on Next.


Step 7: Select Address Pool of Network such as 10.5.50.2-10.5.50.254 > Click On Next.


Step 8: Select Certificate as None > Click On Next.


Step 9: Put SMTP Server IP Address > Click On Next.


Step 10: Put Worldwide DNS Server IP Address such as 8.8.8.8> Click On Next.


Step 11: Give name of DNS Name > Click On Next.


Step 12: Create Local Hotspot User and password > Click On Next.


 Step 13:  Click On ok.


Step 14: Click on Users Tab in Hostpot wizard > Click on Plus (+) sign. 


Step 15: Give User Name and password on which has right to access internet.


When you access internet on your client system that ask for authentication user and and password, then you need to put user name and password which you create at your last step.

Now you see that you are able to access Internet on your system.


Hope this will help to all of you and resolved your all query if you have any query or question so you may ask to send email on our email account (onlinenetworkssolution@gmail.com) or leave comment on page.

How To Block HTTPS websites on Mikrotik Router

By // No comments:
How To Block HTTPS facebook, youtube and another websites on Mikrotik Router via winbox

Today we will share will all of you about how to block HTTPS facebook, youtube, gmail and another website through Mikrotik Router via Winbox. 


Please follow step by step to block HTTPS facebook, youtube, gmail and another website through Mikrotik Router via Winbox. 


Step 1: Click on Mangle Tab > Click on Plus (+) sign >  In the General Tab Dropdown chain and select forward > Put here Src. address (Source Address) such as 192.168.111.1 > Click on Action Tab > Dropdown Action and select mark connection > Type New Connection Name such as block facebook > Click Apply and Ok.

Step 2: Click on Filter Rules Tab > Click on Plus (+) sign >  In the General Tab Dropdown chain and select forward  > Dropdown Connection Mark and select block facebook website Name which you have given > Click on Advanced Tab > Type facebook in Content > Click on Action Tab > Dropdown Action and select drop packet > Click Apply and Ok.


Hope this will help to all of you and resolved your all query if you have any query or question so you may ask to send email on our email account (onlinenetworkssolution@gmail.com) or leave comment on page.


How to block website in Mikrotik Router via Winbox

By // No comments:
How to block facebook, youtube and another website in Mikrotik Router via Winbox

Today we will share will all of you about how to block facebook, youtube, gmail and another website through Mikrotik Router via Winbox. we have two method which is used to block website in mikrotik router. First method is used to block website in multiple WAN link for internet access and second method if you have to block website on particular WAN link. 


First Method:

Step 1: Login via WinBox on Mikrotik Router, Click on IP > Firewall 


Step 2: Click on Layer 7 Protocols Tab and then click on Plus (+)sign.


Step 3: Type Name of website and then put below code in Regexp.

             ^.+(facebook.com).*$


Step 4: Click on Filter Rules Tab > Click on Plus (+) sign >  In the General Tab Dropdown chain and select forward > Click on Advanced Tab > Dropdown Layer 7 Protocol and select facebook website Name which you have given > Click on Action Tab > Dropdown Action and select drop packet > Click Apply and Ok.


Finally you have blocked website!!!!!


Second Method:

Please follow above till 3 step and then use below step to block website on Wan IP address.

Step 4: Click on Filter Rules Tab > Click on Plus (+) sign >  In the General Tab dropdown chain and select forward > Put Wan static IP address in Src. Address (Source Address)> Click on Advanced Tab > Dropdown Layer 7 Protocol and select facebook website Name which you have given > Click on Action Tab > Dropdown Action and select drop packet > Click Apply and Ok.


Hope this will help to all of you and resolved your all query if you have any query or question so you may ask to send email on our email account (onlinenetworkssolution@gmail.com) or leave comment on page.

How to port forwarding in Mikrotik Router

By // No comments:
How to port forwarding in Mikrotik Router

Today we will learn that how to configure port forwarding in Mikrotik Router via winbox. This is most important feature which require every body in organization because we want to remotely access our Camera, RDP, Telnet, www and another port according to our need. so in this post we will share with all of you that how much easy this to configure port forwarding in Mikrotik Router and it's cheapest way.


Please follow below step by step to configure port forwarding in Mikrotik Router:

Step 1: Click on IP and then Firewall. New window will be appear on you display as you see below.
             Click on Plus (+) sign.


Step 2: Drop down of chain in which you have to select dstnat > Put WAN static IP such as 61.95.235.98 in Dst. Address (Destination IP address) > Click on Protocol and select TCP/UDP according to your requirement > then Put Dst. Port (Destination Port Number) > Then Click on Action Tab.


Step 3: Drop down Action and select Dstnat > Put Local IP Address in To Addressed (Put here your remote system's local IP address which you require to access from outside such as if you have to take RDP of any system so put here system IP address)  > Then put port number in To Ports (Put here that port number which you require) > and then click on Apply and OK.


Finally you see your NAT configuration in NAT tab as we have been shown here in below image. Please wait for some time because it's take some time to update their services.


Important :- 

Above rule work make connection between Router to Lan whereas we require WAN to Router connection  from remote access so create Firewall Rule which make connection between Wan to Router.

Click on IP, then Firewall, then Filter Rules > Click the + to add a new rule > Change Chain to input > Change Protocol to tcp > Change Dst. Port to 8291 > Click on the Action tab and make sure Action is set to accept > Click Comment and name it something like “winbox” > Click OK.

Note:-Your new Filter Rule will be at the bottom of the list.  Drag it up above the last “drop” rule from the default configuration.
Filter Rules are matched in order. They start at the top and work through each one.  If your new rule is AFTER the “drop” rule, it will not work.


Hope this will help to all of you and resolved your all query if you have any query or question so you may ask and send email on our email account (onlinenetworkssolution@gmail.com) or leave comment on page.