Installing & Configuring WSUS in Server 2012 R2
Today we will see that how to configure WSUS Server and update updates on clients computer via group policy in Window server 2012.
Before we start, please do understand that, all this implementation & configuration of this WSUS is happening in Hyper-V, and all my small infra is running fully virtualization, and since this WSUS is involve with internet connection, please do remind also that you need an internet connection attach to VM.
Please make sure you Domain Server @ any Server that you want to install WSUS must have internet connection so that easy for you to stimulate the WSUS process, so that please attach 2nd Network Adapter to WSUS Server to be.
If you’re not sure please refer to this print screen :
So, once you confirm that your WSUS Server having internet connection, lets proceed with the WSUS installation Process.
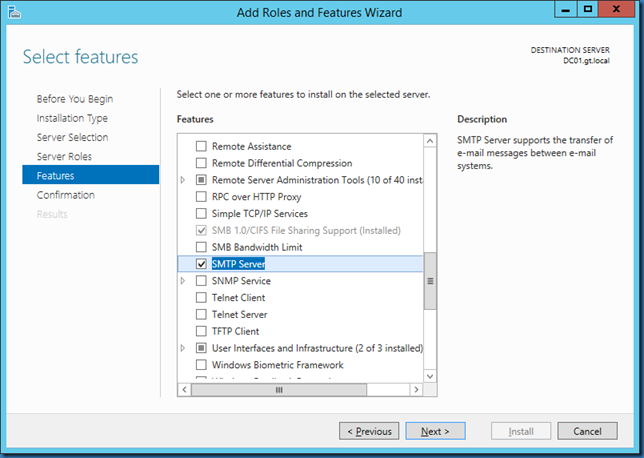
Step 1 – On your Server, open Server Manager, on the Dashboard, click Add Roles and Features then click next 3 times till you get Select server roles box, in Select server roles box, select the Windows Server Update Services (In the pop-up window, click Add Features)… then click Next…
Step 2 – On the Select features box, click Next…
Step 3 – On the Windows Server Update Services box, click Next…
Step 4 – On the Select role services box, verify that both WID Database and WSUS Services are selected, and then click Next…
Step 5 – On the Content location selection box, type C:\Comsys WSUS, and then click Next…
Step 6 – On the Web Server Role (IIS) box, click Next…
Step 7 – On the Select role services box, click Next…
Step 8 – On the Confirm installation selections box, click Install…
Step 9 – When the installation completes, click Close…
Step 10 – Open Windows Server Update Services console, in the Complete WSUS Installation window, click Run, and wait for the task to complete then click Close…
We had successfully installed WSUS on DC01.comsys.local now, our next task is to configure WSUS to synchronize with Windows Updates…
Step 11 – In the Windows Server Update Services Configuration Wizard window, on the Before You Begin, click Next to proceed…
Step 12 – On the Join the Microsoft Update Improvement Program, just click Next…
Step 13 – On the Choose Upstream Server box, click the Synchronize from Microsoft Update option and then click Next…
Step 14 – On the Specify Proxy Server box, click Next…
Step 15 – On the Connect to Upstream Server box, click Start Connecting. Wait for the Windows Update to be applied, and then click Next…
Step 16 – On the Choose Languages box, click Next…
Step 17 – On the Choose Products box, I choose Windows 8 and Windows Server 2012 R2 (you can use any Updates follow by you existing application), and click Next…
Step 18 – On the Choose Classifications box, I choose Critical Updates (you can choose all updates classification if you require and your internet is fast) click Next…
Step 19 – On the Set Sync Schedule box, I choose Synchronize manually, then click Next…
Step 20 – On the Finished box, click the Begin initial synchronization option, and then click Finish…
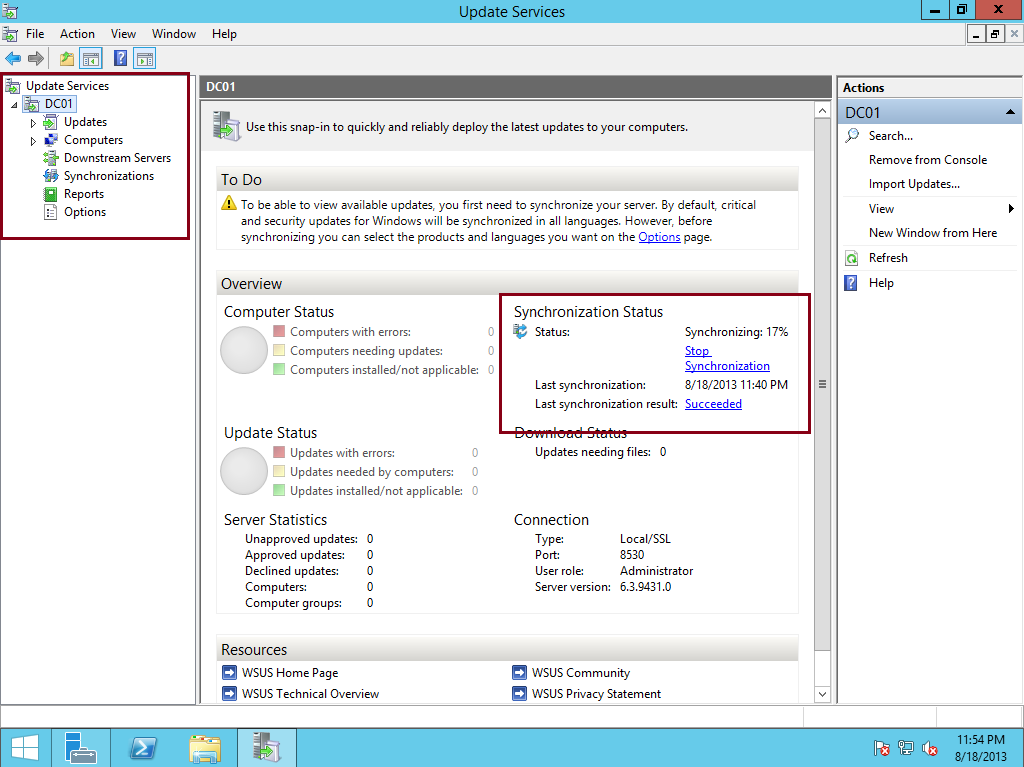
Step 21 – In the Windows Server Update Services console, in the navigation pane, double-click DC01, and please spend few minutes to reviews what you had on the WSUS consoles and the information…
** If you notice in my WSUS Server, WSUS is synchronizing update information, this might take few minutes…
** If everything goes well, on the synchronization status you can see that Status is Idle and the Last Synchronization result: Succeeded…
Step 22 – Next, let’s add Computer Group to WSUS, this method is to make sure that any computer listed in the Computer Group will get the Updates from WSUS Server…
On the WSUS console, click Options and then double click Computers…
Step 23 – In the Computers dialog box, select Use Group Policy or registry settings on computers then click OK…
** I choose Use Group Policy because I wanted all my Clients getting windows updates by GPO…
Step 24 – Next, click All Computers, and then, in the Actions pane, click Add Computer Group…
Step 25 – In the Add Computer Group dialog box, in the Name text box, type Comsystem Laptop, and then click Add…
Step 26 – Once you successfully add a New Computer Group to WSUS, now we need to create new GPO and configure it so that all our clients will be effected by this GPO to get the Windows Updates…
** On the Domain Server, open Group Policy Management, right click Comsystem Laptop and then click Create a GPO in this domain, and Link it here…
Step 27 – In the New GPO dialog box, type WSUS Comsystem Laptop ,and then click OK…
Step 28 – Next, right-click WSUS Comsystem Laptop, and then click Edit…
Step 29 – Next, in the Group Policy Management Editor, under Computer Configuration, double-click Policies, double-click Administrative Templates, double-click Windows Components, and then click Windows Update…
Step 30 – Next, in the Setting pane, double-click Configure Automatic Updates, and then click the Enabled option, under Options, in the Configure automatic updating field, click and select 3 – Auto download and notify for install, and then click OK…
Step 31 – In the Setting pane, double-click Specify intranet Microsoft update service location, and then click the Enabled option, then in the Set the intranet update service for detecting updates and the Set the intranet statistics server text boxes, type http://dc01.comsys.local:8530, and then click OK…
Step 32 – In the Setting pane, double click Enable client-side targeting, in the Enable client-side targeting dialog box, click the Enabled option, in the Target group name for this computer text box, type Comsystem Laptop, and then click OK…
Step 33 – Next, let’s log in to our client PC as domain administrator and verify that our client is receiving the GPO by typing
gpresult /r in the command prompt, In the output of the command, confirm that, under COMPUTER SETTINGS, WSUS Comsystem Laptop is listed under Applied Group Policy Objects…
Step 34 – Next, we need to Initialize the Windows Update by typing Wuauclt.exe /reportnow /detectnow in the cmd…
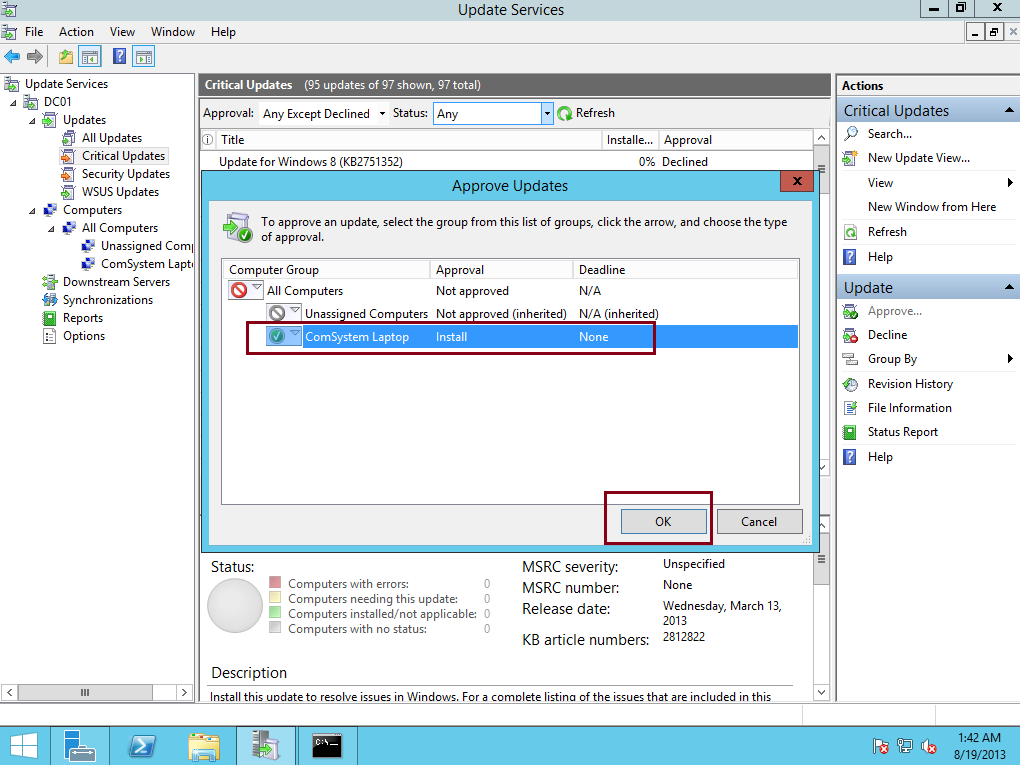
Step 35 – Next, we need to Approve and at the same time deploy an Update to our client PC…
in WSUS console, under Updates, click Critical Updates, right click any updates you prefer for your client PC and then click Approve…
Step 36 – In the Approve Updates window, in the Com system Laptop drop-down list box, select Approved for Install…
Step 37 – Next, Click OK and then click Close…
Step 38 – Now, to deploy the selected updates, on the Client PC, in the cmd type Wuauclt.exe /detectnow…
Step 39 – before you confirm the client can receive the update from the WSUS Server, return to WSUS Server and the on the WSUS console, on the Download Status, verify that the necessary / selected updates is finish downloading…
Step 40 – Next, Click Critical Updates, an the right panes, verify that few updates is stated 100%…
Step 41 – Now return to Client PC and open Windows Update from Control Panel, you should notice update available for your client PC and you can proceed with installation…
We done for now
Please leave comment i hope this article more helpful to you all, please let me know if you are facing any issue and leave comment.