Showing posts with label command line. Show all posts

List of command of Windows

By // No comments:

List of command


In this Article we will see list of command which is used daily basis help us to open these via command.


List of command below :

Add/Remove Programs = appwiz.cpl
Administrative Tools = control admintools
Authorization Manager= azman.msc “New”

Calculator = calc
Certificate Manager = certmgr.msc
Character Map = charmap
Check Disk Utility = chkdsk
Control Panel = control “New”
Command Prompt = cmd.exe
Component Services = dcomcnfg
Computer Management = compmgmt.msc = CompMgmtLauncher “New”

Date and Time Properties = timedate.cpl
Downloads = Downloads “New”
Device Manager = devmgmt.msc
Direct X Troubleshooter = dxdiag
Disk Cleanup Utility = cleanmgr
Defragment User Interface = dfrgui “New”
Ditilizer Calibration Tool = tabcal “New”
Disk Management = diskmgmt.msc
Disk Parmelonion Manager = diskpart
Display Properties = control desktop or desk.cpl
DPI Scaling = dpiscaling “New”
Driver Package Installer = dpinst “New”
Driver Verifier Utility = verifier or /reset
DVD Player = dvdplay “New”

Encryption File System = rekeywiz “New”
Event Viewer = eventvwr.msc
Fax Cover Sheet Editor = fxscover “New”
File Signature Verification Tool = sigverif
Folders Properties = control folders
Fonts = control fonts
Free Cell Card Game = freecell

Group Policy Editor = gpedit.msc
Internet Explorer = iexplore
Iexpress Wizard = iexpress
Internet Properties = inetcpl.cpl
IP Configuration = ipconfig.exe
iSCSI Initiator = iscsicpl “New”

Keyboard Properties = control keyboard

Libraries = explorer or Windows key + E
Local Security Settings = secpol.msc
Local Users and Groups = lusrmgr.msc
Logs You Out Of Windows = logoff

Microsoft Support Diagnostic Tool = msdt “New”
Microsoft Paint = mspaint.exe
Mouse Properties = control mouse
Mouse Properties = main.cpl
Mobility Center (only on mobile) = mblctr or Windows key + X
Network Connections = control netconnections
Network Connections = ncpa.cpl
Notepad = notepad

ODBC Data Source Administrator = odbcad32 “New”
Optional Features Manager = optionalfeatures “New”
On Screen Keyboard = osk or Windows key + U

Performance Monitor = perfmon.msc
Phone and Modem Options = telephon.cpl
Power Configuration = powercfg.cpl
Printers and Faxes = control printers
Printer Migration = PrintBrmUi “New”
Private Character Editor = eudcedit


Regional Settings = intl.cpl
Registry Editor = regedit.exe
Remote Assistance = msra “New”
Remote Desktop = mstsc
Resultant Set of Policy = rsop.msc
Scheduled Tasks = control schedtasks
Security Center = wscui.cpl
Services = services.msc
Shared Folders/MMC = fsmgmt.msc

Shuts Down Windows = shutdown
Snipping Tool = snippingtool “New”
Sounds and Audio = mmsys.cpl
Sound Recorder = soundrecorder “New”
Sound Volume = sndvol “New”
Spider Solitare Card Game = spider
SQL Client Configuration = cliconfg
Stored User Names and Passwords = credwiz “New”
Sticky Note = StikyNot “New”
System Configuration Editor = sysedit
System Configuration Utility = msconfig
System File Checker Utility = sfc
System Information = msinfo32
System Properties = sysdm.cpl or Windows key + Pause/Break
System Restore = rstrui.exe
Task Manager = taskmgr
Trusted Platform Module = TpmInit “New”

Utility Manager = utilman
User Accounts = netplwiz or control userpasswords2

Windows Activation = slui “New”
Windows Backup Utility = sdclt “New”
Windows Fax and Scan = wfs “New”
Windows Firewall = firewall.cpl
Windows Firewall with Advanced Security = wf.msc “New”
Windows Image Acquisition = wiaacmgr “New”
Windows Media Player = wmplayer
Windows Magnifier = magnify
Windows Management Infrastructure = wmimgmt.msc
Windows Update App Manager = wuapp “New”
Windows Standalong Update Manager = wusa “New’
Windows System Security Tool = syskey
Windows Share Creation Wizard = shrpubw “New”
Wordpad = write


Hope this will help to all of you and resolved your all query if you have any query or question so you may ask on email our email account (onlinenetworkssolution@gmail.com) or leave comment on page.

How To Automatically Export the Result of a Ping Command

By // No comments:

How To Automatically Export the Result of a Ping Command


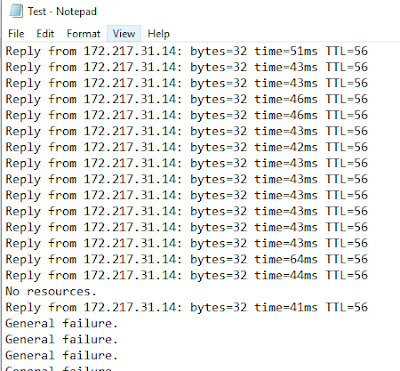
In this article we will see How to generate log of ping command.

Windows allows you to send a message, called a ping to other computers in your local network.

If you would like to export the result of a ping command to a text file.

How To Automatically Export the Result of a Ping Command


Open the command prompt by going to Start > Run and typing cmd.

Type C:\>ping www.google.com >> c:\Test.txt -t".

See Images for more information:


Your ping command should now be displayed.


Hope this will help to all of you and resolved your all query if you have any query or question so you may ask on email our email account (onlinenetworkssolution@gmail.com) or leave comment on page.

Linux Network Configuration

By // No comments:

Linux Network Configuration in Linux/Centos


Today we will see in this post that How to set up network configuration in Linux/centos such as How to assign Static ip address, How to assign gateway, how to assign DNS, How to change hostname in linux. It's very easy to assign static ip address, DNS, Gateway and Host name. Please read full articles if you face any problem regarding this articles so please leave comments or drop email within 24 hours you will get reply by our team.

Please leave comment if article good and share it also.


To check hostname in Linux/Centos:

[root@localhost ONS]# hostname

To change hostname temporary in Linux/Centos:

[root@localhost ONS]# hostname newhostname

To change hostname permanent in Linux/Centos:

[root@localhost ONS]# vim /etc/sysconfig/network

NETWORKING=yes
HOSTNAME=localhost.local --------> please change localhost.local into newhostname.local (according to your requirement)

To restart network service in Linux/Centos:

[root@localhost ONS]# service network restart


To check ip address in Linux/Centos:

[root@localhost ONS]# ifoconfig

To assign static ip address temporary in Linux/Centos:

[root@localhost ONS]# ifconfig eth0 192.168.1.250 netmask 255.255.255.0

To assign static ip address permanent in Linux/Centos:

[root@localhost ONS]# vim /etc/sysconfig/network-scripts/ifcfg-eth0

View this detail

DEVICE="eth0"
BOOTPROTO="DHCP" 
HWADDR="00:0C:29:56:4E:9E"
MTU="1500"
NM_CONTROLLED="yes"
ONBOOT="yes"

Change some configuration:

DEVICE="eth0"
BOOTPROTO="static"
HWADDR="00:0C:29:56:4E:9E"
IPADDR=192.168.1.253
NETMASK=255.255.255.0 or PREFIX=24
MTU="1500"
NM_CONTROLLED="yes"
ONBOOT="yes"

To restart network service in Linux/Centos: 

[root@localhost ONS]# service network restart

To assign Gateway ip address in Linux/Centos: 

[root@localhost ONS]# vim /etc/sysconfig/network

NETWORKING=yes
HOSTNAME=localhost.local
GATEWAY=192.168.1.1

To assign DNS ip address in Linux/Centos:

[root@localhost ONS]# vim /etc/resolv.conf

nameserver 192.168.1.1 or 8.8.8.8

To restart network service in Linux/Centos: 

[root@localhost ONS]# service network restart

Note: Please don't forgot to restart service of network because it will update own recent changes.

Hope this will help to all of you and resolved your all query if you have any query or question so you may ask on email our email account (onlinenetworkssolution@gmail.com) or leave comment on page.

How to Make a Bootable MAC OS X Yosemite USB Install Drive

By // No comments:

How to Make an OS X Yosemite Boot Installer USB Drive.


Today we will see in this article that How to Make an OS X Yosemite Boot Installer USB Drive, How to make bootable pen drive of  MAC OS X Yosemite and How to install it . Please read full articles if you face any problem regarding this articles so please leave comments or drop email within 24 hours you will get reply by our team.

Please leave comment if article good and share it also.

Please follow all step to make bootable pen drive of MAC OS.

Note:- USB should be atleast 8GB and above.

Step 1. Connect the USB drive to the MAC and launch Disk Utility.

Step 2. Select that USB drive from the left side drive list (Please be sure you select only USB drive which you want to make bootable)

Step 3. Click on the "Erase" tab and the format the drive as "Mac OS Extended (Journaled)"

Step 4. Then choose “Erase” and confirm.

Step 5. Now go  “Partition” tab > under ‘Partition Layout’ click on the pulldown menu > changing it from “Current” to “1 Partition” > Make a 1 partition


Step 6. Change name to “Untitled” from ‘Untitled 1’ > then click on the “Options” button.

Step 7. Choose “GUID Partition Table” as the partition scheme and choose “OK”


Step 8. Click “Apply” and confirm the creation of the partition

Step 9. Exit of Disk Utility when finished

Step 10. Open Terminal > Paste command which mentioned below.

----------------------------------------------------------------------------------------------------------------------
 sudo /Applications/Install\ OS\ X\ Yosemite.app/Contents/Resources/createinstallmedia --volume /Volumes/Untitled --applicationpath /Applications/Install\ OS\ X\ Yosemite.app --nointeraction
----------------------------------------------------------------------------------------------------------------------


Step 11. Then type password. Then it will take some time and after whole process you will see that pendrive name has been changed.

Now it means that it is ready !!!!!!

How to install MAC OS X Yosemite by Bootable pen drive:

Step 1: Insert Bootable pen drive with MAC.

Step 2: Press "Power" button, then press "Option/alt" button kindly press 10 sec continuous

Step 3: Click on install OS X Yosemite >  Click on Continue > Click on Agree > Again click on Agree > Select Disk Partition > Click on Continue.

Now you will see that installation process is being started, after completing process your MAC is ready to basic configure.

Successfully installed!!!!!!!!!!

Hope this will help to all of you and resolved your all query if you have any query or question so you may ask on email our email account (onlinenetworkssolution@gmail.com) or leave comment on page.

Most useful basic Linux/Centos command

By // No comments:

Most useful basic Linux/Centos command


Today we will see in this post that basic command in Linux/Centos. It's very easy to create, change, modify and delete files and directory. Please read full articles if you face any problem regarding this articles so please leave comments or drop email within 24 hours you will get reply by our team.

Please leave comment if article good and share it also.


Please follow all command of linux:

To create a directory(dir):

[root@localhost ONS]# mkdir ram

To enter in any directory:

[root@localhost ONS]# cd ram

To come out from directory:

[root@localhost ONS]# cd ..

To come in top level directory from any directory:

[root@localhost ONS]# cd /

To check the current working directory:

[root@localhost ONS]# pwd


To clear the screen:

[root@localhost ONS]# clear

To check the list of files and directory:

[root@localhost ONS]# ls

To check the list of files and directory permission:

[root@localhost ONS]# ls -l

To delete a blank directory:

[root@localhost ONS]# rmdir ram

To remove directory with his subdirectory:

[root@localhost ONS]# rm -r ram

To check the terminal:

[root@localhost ONS]# tty

To check how many users login on computer:

[root@localhost ONS]# who

To check currently login user on your prompt:

[root@localhost ONS]# whoami

To Eject the CD/ROM and DVD/ROM:

[root@localhost ONS]# eject

To insert the CD/ROM and DVD/ROM:

[root@localhost ONS]# eject -t

To mount the CD/ROM and DVD/ROM:

[root@localhost ONS]# mount /dev/dvdrom /mnt

To dismount the CD/ROM and DVD/ROM:

[root@localhost ONS]# unmount /dev/dvdrom /mnt


Hope this will help to all of you and resolved your all query if you have any query or question so you may ask on email our email account (onlinenetworkssolution@gmail.com) or leave comment on page.

Linux Chown command

By // No comments:

How to use Linux Chown command


Today we will see in this post that how to change ownership and group permission on file and directory in Linux through command line. It's very easy to create, change, modify and delete ownership and group permission. Please read full articles if you face any problem regarding this articles so please leave comments or drop email within 24 hours you will get reply by our team.

Please leave comment if this article good and share it also.


Chown:

CHOWN stands for CHange file OWNer and Group. The chown command is most commonly used by Unix/Linux system administrators. chown is a command to change the ownership of a file/folder or even multiple files/folders at a time to a specified user/group. who need to fix a permissions problem with a file or directory, or many files and many directories.


To Change the owner of a file;

[root@localhost ONS]# ls -l testfile
-rw-r--r-- 1 root root 0 2017-05-22 20:03 testfile

[root@localhost ONS]# chown owner testfile

[root@localhost ONS]# ls -l testfile
-rw-r--r-- 1 owner root 0 2017-05-22 20:03 testfile

To Change the group of a file:

[root@localhost ONS]# ls -l testfile
-rw-r--r-- 1 root root 0 2017-05-22 20:03 testfile

[root@localhost ONS]# chown :group testfile

[root@localhost ONS]# ls -l testfile
-rw-r--r-- 1 root group 0 2017-05-22 20:03 testfile

To Change both owner and the group:

[root@localhost ONS]# ls -l testfile
-rw-r--r-- 1 root root 0 2017-05-22 20:03 testfile

[root@localhost ONS]# chown owner:group testfile

[root@localhost ONS]# ls -l testfile
-rw-r--r-- 1 owner group 0 2017-05-22 20:03 testfile


To Change the owner/group of the files by traveling the directories recursively:

Recursively grant ownership of the directory /files/work, and all files and subdirectories

[root@localhost ONS]# ls -l linux/linux1
-rw-r--r-- 1 root root 0 2017-05-22 21:52 linux/linux1

[root@localhost ONS]# chown -R owner:group linux/

[root@localhost ONS]# ls -l linux/redhat/test
-rw-r--r-- 1 owner group 0 2017-05-22 21:52 linux/redhat/test


Hope this will help to all of you and resolved your all query if you have any query or question so you may ask to send email on our email account (onlinenetworkssolution@gmail.com) or leave comment on page.


How to create group in Linux

By // No comments:

How to create group in Linux


Today we will see in this post that how to create group in Linux through command line. It's very easy to create, change, modify and delete group information. Please read full articles if you face any problem regarding this articles so please leave comments or drop email within 24 hours you will get reply by our team.

Please leave comment if this article good and share it also.


To create group account:

[root@localhost ONS]# groupadd saiyyad

To set password on group account:

[root@localhost ONS]# gpasswd saiyyad
Changing the password for group saiyyad
New Password:
Re-enter new password:

To create and change Group's GUID:

[root@localhost ONS]# groupadd -g 1200 saiyyad
[root@localhost ONS]# groupmod -g 1201 saiyyad

To remove group password:

[root@localhost ONS]# gpasswd -r saiyyad


To change/rename group's name:

[root@localhost ONS]# groupmod -n ITmanager saiyyad

To delete/remove group account:

[root@localhost ONS]# groupdel saiyyad

To add a user into a group:

[root@localhost ONS]# gpasswd -a test saiyyad

To add multiple user into a group at same time:

[root@localhost ONS]# gpasswd -M test,deepak,raju saiyyad

To delete a user from group:

[root@localhost ONS]# gpasswd -d test saiyyad

To check member of group information:

[root@localhost ONS]# getent group saiyyad

To check the group information:

[root@localhost ONS]# vi /etc/group
[root@localhost ONS]# cat /etc/group

Hope this will help to all of you and resolved your all query if you have any query or question so you may ask to send email on our email account (onlinenetworkssolution@gmail.com) or leave comment on page.

How to create user in Linux

By // No comments:

How to create user in Linux ?


Today we will see in this post that how to create user and group in Linux through command line. It's very easy to create, change, modify and delete user and group information. Please read full articles if you face any problem regarding this articles so please leave comments or drop email within 24 hours you will get reply by our team. 

Please leave comment if this article good and share it also. 


About Users


To create an user:

[root@localhost ONS]# useradd test

To set password on a user:

[root@localhost ONS]# passwd test
Changing password for user test.
New password:
Retype new password:
passwd: all authentication tokens updated successfully.

To add comment user:

[root@localhost ONS]# useradd -c “IT” test

To set/Change UID on user:

[root@localhost ONS]# useradd -u 0786 test

To set/change directory of user:

[root@localhost ONS]# useradd –d /home/test test

To add a user to a primary group and supplementary group:

[root@localhost ONS]# useradd -g “head” -G “faculty” test

To Lock the user account:

[root@localhost ONS]# passwd -L test
Locking password for user test.
passwd: Success

To unlock the user account:

[root@localhost ONS]# passwd -U test
Unlocking password for user test.
passwd: Success

To change login name of the user:

[root@localhost ONS]# usermod -l “test1” test

To remove/delete user with his home directory:

[root@localhost ONS]# userdel -r test

To delete/remove user only:

[root@localhost ONS]# userdel test


To set maximum days of change password:

[root@localhost ONS]# passwd -x 30 test

To set minimum days of change password:

[root@localhost ONS]# passwd -n 3 test

To set warning days to change password:

[root@localhost ONS]# passwd -w 25 test

To set all command in one command:

[root@localhost ONS]# passwd -x 30 -n 3 -w 25 test

To check user information

To check the user information such as UID, Home directory, login shell etc:

[root@localhost ONS]# vi /etc/passwd

To check the all information about user password information:

[root@localhost ONS]# vi /etc/shadow


Hope this will help to all of you and resolved your all query if you have any query or question so you may ask to send email on our email account (onlinenetworkssolution@gmail.com) or leave comment on page.