

How to configure of Hikvision on internet for online View?
This is best way to configure hikvision camera on internet for online view and hikvision give us this facility to access their camera through internet from worldwide area. It can be configured by static IP address or if you have no any static IP address so hikvision can be configured by dynamic IP address.
First Method
Step 1:-
Firstly you need to connect your Hikvision DVR from your system.
Press "Ctrl+R' button and type "cmd' then command prompt will be displayed on your system after that type "ipconfig" then see what is you are getting IP address and then that ip address put on your internet explorer url such as "192.168.0.1".
Step 2:-
After that you will get hikvision admin portal for login in that put user name and password by default username "admin" and password "1'.
see screen shot of portal.


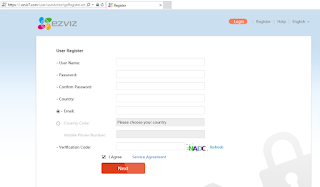
Step :- To do configure second method please follow till above step 5 then open www.ezvizlife.com on Internet explorer.

Step 6:-
Register on ezvizlife website so please see below screen shot for further process.


Step 9:-


Firstly you need to connect your Hikvision DVR from your system.
Press "Ctrl+R' button and type "cmd' then command prompt will be displayed on your system after that type "ipconfig" then see what is you are getting IP address and then that ip address put on your internet explorer url such as "192.168.0.1".
Step 2:-
After that you will get hikvision admin portal for login in that put user name and password by default username "admin" and password "1'.
see screen shot of portal.

Step 3:-
Expand network setting then press on "TCP/IP" and see there you will get Dhcp enable so unchecked of Dhcp and mention static ip address of local network which has not been assigned ip address on another system and fill up all configuration which required.

Step 4:-
Expand network setting then press on "port" then see there that below all the port are mentioned on their and then press on "save".
See screen shot for above step.

Step 5:-
Now you have to login your "Adsl+router" means modem for port forwarding and mentioned above these port 80,554 and 8000 set your virtual host or NAT on your modem.
Step 6:-
Open your browser and type "http://www.hik-online.com/" and click on Register and then make your ID on hik-online site .

Step 7:-
Check your ip address on port scan "http://www.t1shopper.com/tools/port-scan/" then check port 80,554 and 8000 is open.

Step 8:-
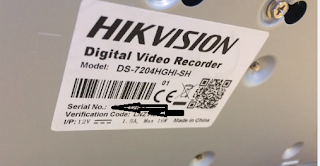
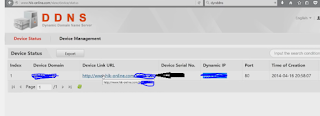
Then do further process creating your account on hik-online website then click on device management - then press "add" - Put serial number on device serial number and then move on hikvision dvr setting on DDNS and check mark on enable DDNS and select on HIDDNS and leave as it server address and put your unique domain name which should be unique.


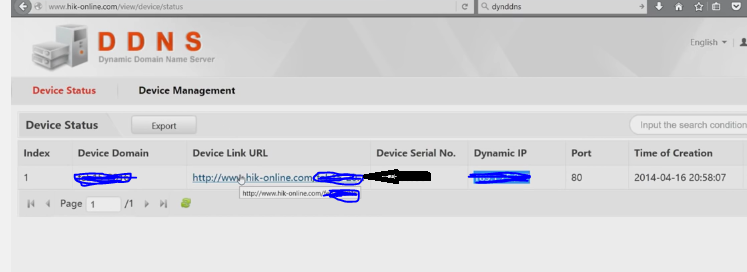
Step 9:-
last step click on url then check that your camera is working online.
Congratulation!!!!
Second Method
How to configure hikvision DVR on internet when your IP address port block?

Step 6:-
Register on ezvizlife website so please see below screen shot for further process.


Step 8:-
Click on download plug in. and then follow screen shot step.

Press on "Run"

Allow for all websites.

Step 9:-
Click on Add now

Step 10:-
Click on add by Serial No.

Step 11:-
Mentioned your serial no. to detect your DVR on browser.

After Search your DVR then Click on Add symbol "+'.

Step 12:-
Then one pop will be on your screen and put your verification code then click on add.

Step 13:-
Give Name of DVR then press ok.

Finally you have configured your hikvision dvr on internet.

0 comments:
Post a Comment